Indigenous Workshop Moccasin Making Kit

History

All American Indian moccasins were originally made of soft leather– usually deerskin– stitched together with sinew. Though the basic construction of Native American moccasins was similar throughout North America, moccasin patterns were subtly different in nearly every tribe, and Indian people could often tell each other’s tribal affiliation simply from the design of their shoes. Tribal differences included not only the cut of the moccasins designs among different tribes, but also the extensive beadwork, quillwork, painted designs, and fringes many Indian people lavished on their moccasins. In some tribes hardened rawhide was used for the sole for added durability, and in others rabbit fur (or, later, sheep skin) was used to line the leather moccasins for added warmth. Both men and women wore moccasins, although in many tribes the decoration of male and female moccasins used a different pattern. Plains Indian women also wore moccasin boots sometimes, which were basically just womens’ thigh-length leggings sewn to their moccasins for a one-piece look (this style of boot is very beautiful when fully quilled). Heavier-duty boots called mukluks were the invention of the Inuit (Eskimos), who made them of sealskin, fur, and reindeer hide; some subarctic Indian tribes adapted the mukluk style of boots through trade or other contact with the Inuit, using caribou or buckskin instead of sealskin. Today, women adapted the design of the mukluks as part of their traditional wears.
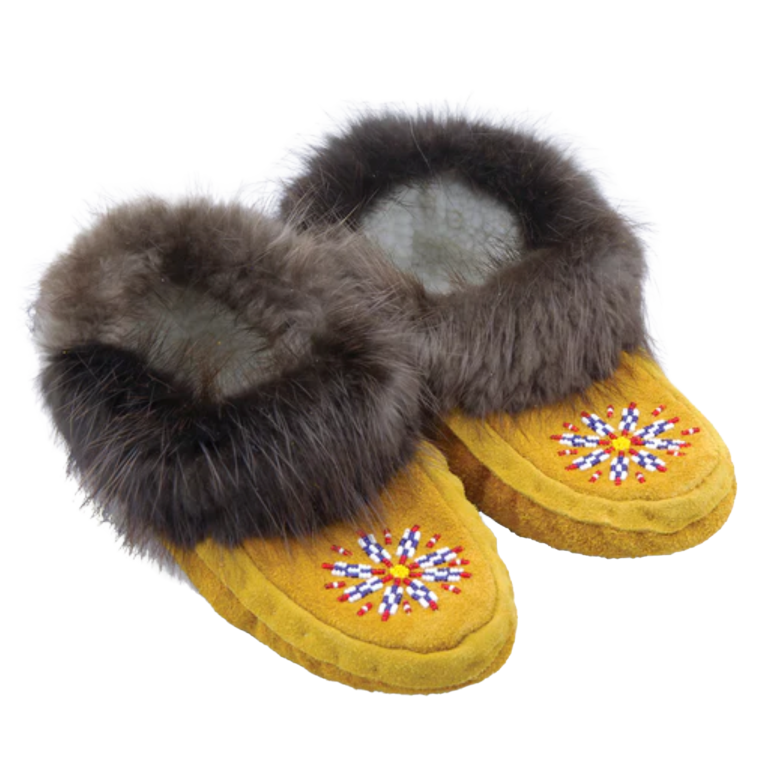
Assembly Instructions

INSTRUCTIONS

CUSTOMIZING YOUR ONE-SIZED MOCCASIN PATTERN

1. Foot Outline
Trace your foot on paper.
Cut out the foot outline.

2. Sole Pattern
Place the foot outline on new paper with the heel 2″ from the bottom edge.
At the widest part of the foot, mark 2″ out on each side.
At the top center, mark 2″ above the outline.
Draw straight lines from the side marks down to the bottom edge.
Connect both side marks to the top mark with a rounded line.
Cut out the sole shape.
Place the foot outline back on the sole; from each heel side, draw a line straight down to the bottom.
Cut these heel lines (do not cut above the heel).

3. Vamp Pattern
With the foot outline on the sole, draw a smaller shape that covers the toes and half the foot on a new smaller piece of paper.
Cut out the vamp pattern.

4. Leather Pieces
Trace 2 soles and 2 vamps onto leather.
Cut them out cleanly.

5. Sherpa Lining
Trace 2 soles and 2 vamps onto sherpa lining.
Cut them out cleanly.

SEWING THE LINING

1. Prepare the Sinew
Unwrap the sinew laces and split each lace into four strands by separating the ends and pulling apart carefully.
Thread the needle with one strand.
Knot the end of the sinew three times.

2. Match up top of the vamp lining with the top of the sole lining and tack down using a glover needle and sinew. Tack bottom right corner of vamp to the right side of the sole. Sew from top to bottom of vamp. Tie a knot three times to secure it. Repeat on other side.

3. Place foot in the lining and gather the material at the bottom of the sole to create the heel, trim off any excess material. Stitch from top to bottom. When you get to the bottom of the heel, sew the heel to the sole by tacking in place then continuing to stitch until it is secured to the sole. Tie a knot three times to secure it.

4. Repeat for other foot. You will now have two linings for your moccasins.

(Optional) Add Beading

If decorating the vamp with beads, complete all beading before sewing. Using felt provided you can trace and bead a design and then attach beaded design to the vamp.

SEWING THE LEATHER

1. Sewing the leather vamp to the sole
Match the center of the vamp to the center top of the sole.
Insert the trim lace between the vamp and sole, leaving extra length on both sides.
Tack all three layers and knot the sinew three times to secure.
Match the bottom right corner of the vamp to the right side of the sole (halfway between top and bottom), insert trim, and tack down. This will be Point A.
Repeat on the left side. This will be Point B.
Begin sewing at the top center and work toward Point A.
With each stitch, make a 1/8″ tuck in the sole and push each tuck close together. As you move farther down, the pieces will align and tucks will no longer be needed.

2. Sewing the heel of the moccasin
Put the moccasin on your foot and slip your foot into the moccasin. Gather the material at the bottom of the sole to create the heel. If there is extra length, mark it.
Take off the moccasin and trim off extra length if there is any.
Match up ends of the sole to create the heel. Using the sinew, tack the top of the ends together and stitch towards the bottom of the heel. Tie a knot three times to secure it.
Sew the remaining gap at the bottom of the heel and tie a knot three times to secure it.
After sewing both sides, turn the moccasin inside out.
Trim the excess trim lace close to the seam without cutting the stitches.

ATTACH SHERPA LINING TO LEATHER SOLE

1. Securing the lining in the moccasin
Place the lining inside the moccasin and line up all edges neatly.
Use butterfly clips to secure the lining to the leather.
Sew the lining and leather together around the entire ankle area to attach them firmly.

ATTACHING THE RABBIT FUR TRIM TO THE MOCCASIN

1. Prepare the Fur
Lay both rabbit fur strips flat and gently groom them so the fur is smooth and neat.

2. Position the Fur Trim
Line the fur strip up with the ankle cuff of the moccasin.
Make sure the fur side and the lining are facing each other.
Tack the fur to the moccasin at the heel seam, starting one centimeter from the edge of the fur trim. This will allow space to sew edges of the seam together.

3. Sew the Fur Trim
Using a whip stitch, sew the fur around the entire ankle area.
When you reach the starting point, trim off excess fur, leaving ½ cm to form the cuff.

4. Form and Close the Cuff
Pinch the two ends of the fur together.
Use a pencil or stick to push the fur inward so the hide edges meet cleanly.
Clip the edges together with a butterfly clip.
Sew the edges closed and tie the thread three times to secure.

5. Securing rabbit fur cuff to moccasin
Turn the rabbit fur outward to form a cuff around the ankle.
From inside the moccasin, make the first stitch outward through the hide and fur.
Pull the thread straight out.
Push the fur upward with your finger so you sew only the hide, not the fur.
Make the next stitch about 1 cm from the first.
Pull tight and ensure no fur gets caught in the thread.
Continue stitching evenly around the entire cuff, keeping stitch spacing consistent.
When you reach the starting point, tie the thread three times on the inside of the moccasin.
Smooth the fur into place.
Repeat for the second moccasin.

TIPS

Butterfly clips to help hold material together while sewing, useful for ensuring seams are straight and even.

Matching the texture of the trim to the texture of the leather, depending which side you choose, matte or smooth side.

When making tucks in your moccasin use your fingers to tuck and hold in place while you make your stitch.

MATERIALS INCLUDED

MATERIALS NOT INCLUDED

Curriculum Outcome

- suitable for junior kindergarten and up -

Buy Your Kits Today!

We offer graduated pricing, and ship by Canada post! If you need your product by a certain date, please, let us know, and we’ll be certain to get it to you.

  • 15-25 Kits $80 ea.
  • 26-40 Kits $78 ea.
  • 41+ Kits $75 ea.